Friday, December 31, 2010

Mech or Foot?

Happy 2011!
For the first post of the year, I will bring up a question that has plagued gamers since the beginning of 5th edition. To mech or not to mech? That is the question.
With the start of 5th edition, there was one major change that stood out more than any other. That change was the increased survivability of vehicles. No longer could a standard vehicle be destroyed by a glancing hit, and on a penetrating hit, the chance of destruction was brought from 50% down to 33%. Games Workshop didn't stop there. In addition to tanks being more survivable, almost every standard transport was reduced in cost when their new codex dropped.
This got people thinking about how metal boxes would insure that their dudes wouldn't die so fast. It also helped assault armies get across the table more quickly. Eventually, pretty much every army, barring tyranids, grey knights, daemons and necrons, was zipping across the table in their own APC.
The metagame, however, would not allow this to continue forever. As more and more tanks came into play, more and more anti-tank weapons came into play. At a tournament scene, a player could expect to come up against mech, and would pack as many lascannons, meltas and missle launchers into their list. With this, mechanized armies died down slightly. While these lists are still quite popular, lists made up of entirely infantry (simple lasagna, man!) sprang up to contest all of these anti-tank lists. Now a line is drawn, and many people are stuck in the middle, unable to decide.
I will not say which is better, for I don't believe that either one is. It depends on your army, and/or the way you want to use that army. Mechanized and foot lists both have pros and cons, but most armies are geared to be able to competitively (for the most part) use either.
With that, I will go over both armies I own and sum up why I play them the way I do. Hopefully I can give a good example that way, without imperatively saying which is better.

--Imperial Guard--
My first army, and my most tested. I run them mechanized, very mechanized. I run them so mechanized that I normally don't put a single infantry model on the table. The reason I run them like this is first off, because they have great transports. 55 points is giving me a 12 10 10 transport with 2 heavy weapons. With that, I.G. also have amazing battle tanks that never make me sad. The reason I love tanks so much is that they protect my infantry and form walls. Imperial guard are good at shooting, not staying alive. Now, this will come up later, but I've noticed that the only armies that should take transports are the armies blessed with cost-efficient transports. I.G. is one of those armies. I have played with platoons a lot, especially back when I had a single chimera, and they definitely have their place in the game. I would never want to imply that infantry guard lists are bad in any way, but they didn't impress me half as much as fully mechanized. I have also toyed with hybrid lists, or a little bit of each. I found a good balance here, but found that I'd rather have small arms fire and anti-infantry guns patter off of my armored chimera hulls than kill my dudes. In my current 1,750 I.G. list, 1,005 points are spent on vehicles, and I have 75 models.

--Eldar--
I run my eldar fully on foot. Not a single tank in my 1000 point list (unless you count war walkers). I once ran my eldar with 3 wave serpents and a fire prism, but my ways have changed to that of simple lasagna. Truth is, the cheapest I could possibly get a single wave serpent was 100 points. As far as firepower goes, the wave serpent has less than the 55 point chimera. As far as survivability goes, it is a 12 12 10 vehicle with resistance to S9+ and weapons that roll 2d6 to penetrate. As far as cost-efficiency goes, it is much worse than the chimera. A single krak missle has the same chance of destroying it as it does a chimera when going against front armor. Yes, the wave serpent is fast, but when it comes down to it, the metagame supports multiple cheap units to single large units. Eldar are not blessed with amazingly cost efficient transports, which is why I don't prefer them to full infantry. I would like to bring up that my eldar are doing as well as my guard on the tables, if not, better. This is partially due to the smart use of cover, and I doubt that someone would consider the armies to be on par with each other when it comes to scariness. In my 1,500 point eldar list, I spend 0 points on tanks, and have 90 models.
With this, I still don't believe it matters a lot. I know, not much of an ending, but I say play what you enjoy. If you like parking lots, play mech. If you like tons of little dudes, play infantry. If Games Workshop is doing anything right, it shouldn't matter in the tournament scene.

Pray they don't take you alive...


Hello, I am back from my holiday sidetrack, and with some goodies from Asdrubael Clause. That's right, I got a Dark Eldar army for christmas! 2 Raiders, a Ravager, some Warriors, some Wyches, and an Archon, making about 600-650 points. I have so far played four games with them, and I have come to a conclusion: They rock. I love the new combat drugs, new splinter weapons, and especially the super-fastness of the army. So far, I have 1 draw and 3 wins with them, And I think I'm getting the hang of it.

The draw, which was nearly a loss, was against an Ork army, and at the end of it I had one wych, a Raider, and an immobilized ravager left. Had the game gone on another turn, i most certainly would have been tabled.

The next game, against some Chaos Space Marines, was radically different. I completely tabled my opponent. The superstars of the game were the tanks, which took out all opposing vehicles, but most of all the Archon, who took out all enemy infantry, which was twelve Khorne Berzerkers, and a Chaos Sorcerer. The Soul Trap/huskblade/shadowfield combo is working out very well, seeing as after he killed the sorcerer he was wounding the berzerkers on twos. I was very disappointed by the Wyches in this game, they did absolutely nothing. I also learned a very important lesson: Don't charge warriors into combat. EVER. Unless it's against really weak combat units like Gretchin or Firewarriors.

The next game was a very close win against some Space Wolves. My Ravager proved very good at popping Razorbacks this game, and my Wyches redeemed themselves in my eyes, killing some Grey hunters and capturing an objective to win the game. Also, I learned that Flickerfields are invaluable. Against a rifleman dreadnought, the 5++ invulnerable save did wonders, keeping a Raider in the air long enough to drive my warriors over to an objective to contest it.

The last game I played was yesterday, and proved to me that Dark Eldar can hang in there and win it for you. I was playing against some Ultramarines, and he had made this list to kill specifically Dark Eldar. The game started out badly for me, with the Wyches' raider getting popped early, and then having a whirlwind barrage land on them didn't help, as it killed five of them. In turn two, my Ravager got killed as well, leaving me with not much to play with. The Warriors got out of their raider, and the Wyches and Archon got into it, and ran up to the area where the marines had castled. In turn two, their raider took out the whirlwind in a massive explosion which killed three marines, and shorted out the Archon's shadow field. The Archon and wyches then went on to kill most of the enemy army. But I would have lost had it not been for the Warrior with a splinter cannon who caused enough wounds on the Ultramarine captain's combat squad, and made them run off the table!

So thoughts? A very good army, a master's army, but good still. I'm very pleased with the results so far, as the speed and high amount of dark lances in this army more than make up for generally weak statlines. I plan on soon adding some more warriors, as they are undoubtedly the most useful unit to me so far.

Tuesday, December 21, 2010

Russes...So Many Russes...

So, for the billionth time, I'm sorry for not posting in so long.
I'd like to make this post about my favorite vehicle in warhammer 40k, the Leman Russ.
In this post, I will go over each Russ variant, and rate it. I actually have experience in this field, as at one time I ran 3 of these bad boys at a time. So let's do a countdown!

#7=The Vanquisher. This is as close to sucking as a leman russ can get. A single shot, S8, AP2, rolls 2d6 to pen vehicles. First of all, I'm going to note that it has a 50% chance of missing outright. Second, it is only AP2. Now, unless you intend on shooting at terminators with your 1 shot (don't), the upgrade from AP3 to AP2 is completely useless. It is also 5 points MORE than the standard russ.

#6=The Punisher. It was a very close call between this and #5, but frankly, I don't see much use in the Punisher. Sure, it has 20 shots, but half of those will miss. Some people will suggest upgrading it with pask, but he brings its already hefty points cost of 180 base up to 230. It is geared towards anti-infantry with its 20 S5 AP- shots, but if you do the math, it will kill 5-6 orks, 4-5 fire warriors, and about 2 marines. A template would do much better here. The extra rear armor is nice, but not nice enough to justify taking one of these competitively. I say it adds a lot of fun in a friendly game, though, so the Punisher will always have a place near my heart.

#5=The Eradicator. I actually think that this is a pretty underrated tank. At 160 points, you get the amazing durability of a leman russ, and a large blast template at S6 AP4 that ignores cover. Honestly, in almost any situation this tank will be more valuable than a Punisher, as it has a 36" range over the Punisher's 24". Frankly, I can't think of any other leman russ variant that would scare my eldar more than this one. That is why the seldom-used Eradicator placed at #5.

#4=The Executioner. At this point, we are getting into the worst of the best. The Executioner is no joke, with a gun equivilent to 3 plasma cannons, and an increased rear armor. The only thing stopping this tank from being used by every guard player in the competitive gaming field is its price of 190 points base. I'd say it may still be worth it, but the best IG players live by several rules. One of those rules is to always keep it cheap.

#3=The Exterminator. It was a very close call between this tank and the Executioner, and I'm still second-guessing myself, but I personally love the Exterminator. It costs 150 points, making it tied with the standard russ for being the cheapest russ variant around. The gun doesn't scream at you "USE THIS!" but 4 twin-linked autocannon shots are pretty darn good. Think of it as a rifleman dread with AV 14, 13, 10 and a heavy bolter/flamer.

#2=The Demolisher. Honestly, the demolisher is amazing. 165 points gives you a 14, 13, 11 tank with a freaking S10 AP2 pie plate and a heavy bolter/flamer. Not much else to say, use it if you have the points. I used to take one, and it never made me sad. It managed to kill about 500 points in a single turn at one point by knocking out a asscannon/heavy flamer dread, 5 furious charge terminators, and a venerable tank hunters dread with a lascannon/miss launcher.

#1=The Battle Tank. I think that this is easily the best tank in the game. Durable as hell, a 72" S8 AP3 large blast cannon, and at a dirt-cheap 150 points, I would never go to war without one of these fellows at my back. I actually added it up, and my 150 point russ killed 380 points in my last game, and it did no better than it normally does.

Hope you enjoyed this article, and if you play guard and don't have a russ, seriously, what's wrong with you?

Wednesday, November 24, 2010

The Simple Lasagna Plan

First of all, happy Thanksgiving!
Today, I bring you a semi-food related article to honor this fattening holiday. When I say "Simple Lasagna Plan", I speak not of meaty, cheesy, deliscious regular lasagna, but of my Eldar list/tactic that I call "The Simple Lasagna Plan". I know, you're probably like "Oh my god, what an awesome name!", but I actually got this name from misreading an article about a 'Simple Lasagna Pan' in Skymall. Now, onto the bulk of the article...
My Eldar have evolved quite a bit. I used to be a dedicated mechdar player, but now I am devoted to the simple lasagna. Before I go into the tactic, I will proudly state that my Eldar are undefeated. I have only had them for about a year, but that still counts for something.
Now, the simple lasagna plan has led to great success for me. It involves taking 3-6 10 man guardian squads for troops, fire dragons for elites, an avatar, and Eldrad.
Here's my 1500 point simple lasagna list:
HQ:
-Eldrad
-Avatar
Elites:
-10 Fire Dragons (x2)
-10 Striking Scorpions, 1 exarch w/ scorpion's claw
Troops:
-10 Guardians w/ a scatter laser (x5)
Heavy Support:
-3 War Walkers, scatter laser/shuricannons
TOTAL: 1497 points

Now, the key to simple lasagna is to split your army into two groups. Some of you are already thinking I'm a nut, but trust me. One of these groups will be offensive, and the other will be defensive. I've found that you need synergy between these two groups, or it may crumple.
I will now sum up the units in my army on how they use the simple lasagna plan to win.

-(Eldrad): I keep him with the scorpions. He is a part of the offensive group with them. His job is to advance about 4" behind the avatar, keeping the scorpions and avatar fortuned. Once he's slogged across the table with his retinue, they can pack a serious punch.

-(Avatar): I deploy him as far forward as I possibly can, as he is in the offensive group. If he's fortuned, he won't die. What's great is that the enemy will shoot at him over your squishy stuff, which is key to simple lasagnas. His primary job is to get shot at, and since he is so scary, he will do his job every time.

-(Fire Dragons): These guys will lurk around the flank through cover. They are in the offensive group, and their primary job is to suicide bomb hard targets. Always take your time and make sure these guys are behind the avatar, or they may take some fire. Don't be afraid to go to ground. These guys won't have much attention paid to them since the avatar is going maximum speed at the enemy, but they can pack a serious punch when they get there.

-(Striking Scorpions): These guys chill with Eldrad and advance with him. Keep them fortuned, keep them in cover. Once they get to the enemy line with Eldrad, they will chew through a lot of units.

-(Guardians): In the defensive group. If they can't really hurt anything, keep them out of line of sight. Their scatter lasers should bang up a lot, but always keep them in cover. If they take fire, always go to ground. These guys are the last thing the enemy should be shooting at if the offensive group is still alive, but they may get shot at occasionally. Their true purpose is to hold objectives and have an insane counter-attack. Not many infantry units can survive 20 S6 shots and 90 S4 shots.

-(War Walkers): Defensive. Keep them in cover, possibly behind some of the guardians. Their main job is to knock out transports for the offensive group and help protect the guardians.

Well, that's my simple lasagna plan. It has worked amazingly for me so far, since in all of my games using it, I have never lost more than 5 models. It has also won every game I've played with it. Remember, synergy is key, and never believe that mech is the only way to use Eldar!

Tuesday, November 9, 2010

Ork tactics (Part 5 of 7): Fast Attack

Sorry for not posting more, I have recently had a pile of work to complete, but now that's over and done with, so time for more!


Stormboyz:

Sort of like a poor man's assault marine, stormboyz strike hard, strike fast, and then die. At 12 points per model, they aren't cheap. They do have the potential for a first turn assault, but there is a 1/6 chance of that. You can still get the shock and awe effect from including boss Zagstruk, but that means that your rather expensive unit suddenly becomes a death unit, and Zagstruk himself is 85 points, which is way to expensive for my pocket!

On the tabletop: The most commonly used method I have seen for this unit is to include Zagstruk , and then suicide on top of a manticore, or some other scary anti-infantry tank, but that inevitably means that your 150+ point unit is being wasted on a tank that is not nearly that expensive.

No, what I see is, don't take Zagstruk, and just take a unit of 10 oth them nilla, and use the opportunistically. See that little devastator squad parked in the enemy's backfield? Use a well-timed Waagh!, a lucky roll for extra move, and you can kill that unit, and then, if you choose to include a nob with a powerklaw, you can take out that Manticore, and hopefully not die.


Warbuggies:

These guys are no less deadly than they ever have been, but, sadly, have been rendered superfluous due to the new Deffkoptas. Even so, there are some things that Warbuggies can do that Deffkoptas cannot. For one, they can be upgraded to Skorchas, which, as everyone knows, are good, because orks having to roll to hit= points not being earned back.

On the tabletop: You are going to want to upgrade them to Skorchas, no question. Not even the mighty Deffkopta can take the dreaded Skorcha. I would say, a unit of 3 Skorchas should be sufficient for burning non-marines out of cover.


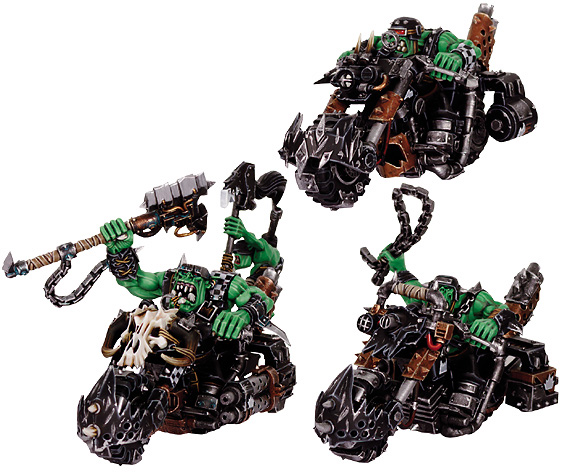
Warbikers (giant pics, ftw)

One of the better options in the Ork codex. Though not as durable or hard-hitting as nob bikers, they are probably a better option for 1500 and under point games, as they are about half the price of a biker nob.

On the tabletop: A cheap, fast-moving, hard-hitting unit is always great, but with a 4+ cover save at all times? Invaluable. Use them as your spear point, to slam into the enemy line before all others. And, remember, you can have an army of them if you take Wazdakka!
Deffkoptas:

Definitely on of the best units in the Ork codex, Deffkoptas bring the firepower where you need it most, quickly and efficiently. Being jetbikes, they can completely ignore terrain for purposes of movement. Add this to the fact that they come with twin-linked big shootas, and are only 35 points base, you can see why they are so popular.

On the Tabletop: Deffkoptas are the most mobile unit in the ork codex, and they are also very useful. If I were playing them, I would take a unit of 3 of them with twin-linked shootas and buzzsaws. That way, though they are very expensive, they can also take on tanks and armored infantry.

Friday, November 5, 2010

Ork tactics (Part 4 of 7): Troops

Hello, again, everyone, for part quatro!Ork Boyz:

Undoubtedly one of the best troops choices in the game, ork boyz are the meat of any ork army. They come equipped with a Slugga and a Choppa, but I would definitely upgrade them with shootas, for free! Why shootas? Well, you're sacrificing one attack, for an 18" ranged assault 2 weapon which, in the proper quantities, can tear apart the enemy in a torrent of highly inaccurate fire.

On the Tabletop: The best configuration for Ork boy mobs is probably to get 15-20 of them with shootas, and 1-2 rokkit launchas, and stick them in a Battlewagon. They are your objective claimers, so you want to keep them alive for as long as possible. The answer to this is to not give them 'eavy armor, but to just keep them in their open-topped battlewagon, and use them as a mobile firebase.Gretchin:

Oh, how I loath these pests. They sit on a home base objective, and then you can ignore them for the rest of the game, and win. Having played against Gretchin many times, i can tell you, they might not be that good, but they are one of those units that you can rely on to sit on an objective, and get ignored for the entire game. And, with a Ballistic Skill of 3, they are also the most accurate unit in the Ork army!

On the Tabletop: Gretchin are good as a supporting unit, but Gork help them if they get into combat with even a partial squad of Space Marines, or even Guardsmen, because they will fold faster than a poker player with a bad hand in combat. With shooting, they may cause a couple of fluky casualties, but I wouldn't count on it. The best thing you can do is just keep them out of harms way, to annoy the enemy where possible.

Thursday, November 4, 2010

Ork tactics (Part 3 of 7): Elites

Hello, there again. You might have noticed that there are now going to be 7 parts of this tactics series. That is because I looked at the Ork codex recently, and it had a few more Heavy support choices than I originally thought, so i decided to divide it into two articles, because if I write a long article, it turns boring at about the 5th unit. You also may have noticed that I skipped Nobz in this article. That is because I have already written a tactics article for them If you want to read it, you can search in the search box above right.
Meganobz:

What could possibly be better than Terminators? The answer is: Orks in Terminator armor! Well technically, it's Mega armor, but that's pretty much terminator armor that comes with a twin-linked shoota, and a powerklaw. And no invulnerable save. but still, pretty cool. They're slow and purposeful, so put them in a Battlewagon or, if you're feeling particularly saucy, a trukk.

On the Tabletop: In small games, I have seen three of these guys slaughter 6 Lictors (It was a kill team mission). No joke. In larger games, however, these guys seem to take the short end of the stick, or, rather, the demolisher rounds. At 40 points a very killable pop, they are very pricey, and if their ride gets crippled early on, that's a big chunk of your points moving at the rate of about 4 inches per turn. If you must take them, get them a Battlewagon, to survive longer, or a trukk, which, if id doesn't die, will take them into easy turn 2 assault range.


Burna Boyz:

Probably the most versatile unit in the Ork codex, armed with a flamer that doubles as a power weapon, they are a bargain at a mere 15 points per model. Taking unit of 12 Burnas in a trukk is a very good idea, and I have seen it win many a game.

On the Tabletop: At first glance, you may be tempted to throw this unit toward the nearest Tactical squad/Termagant brood and have at it, but, believe it or not, there is a more subtle way of using them. Hold them behind your battline and, when the inevitable 1s start falling, use them to fill in any gaps in the line, and watch as they either chop up those pesky Sanguinary Guard, or burn any little alien critters that try and have a go!Tankbustas:

Tankbustas are probably one of the most useful, and most overlooked, units in the Ork codex. Seeing as they come with rokkit launchas and dumbed-down meltabombs as standard, you would think that they got more of a look than they do. Alas, it is not to be. Though a standard Tankbusta is good, their upgrades are pretty good as well. Bomb squigs, as well as being amusing, are simply very good at what they do, which is being a suicide unit. Don't want to have to get into combat with that Dreadnought? A squig will be happy to blow it up for you.

On the tabletop: As with all orks, tankbustas have the quantity, and the quality, but not the accuracy. The best thing you can use Tankbustas for is to use their high strength, low AP weapons to bring down Monstrous Creatures, and transport vehicles. People tend to ignore Tankbustas for some reason, so you will almost certainly be able ot bag 2 or 3 targets before they get obliterated.

Lootas:

A truly wonderful unit, I have seen plenty of winning armies that include 45 lootas. They lend much needed long-ranged fire support to the rest of your army, which, being orks, will tend to be more close-ranged. In a unit of 15, ther D3 shots means that on average, you will be firing 180 shots per game! That's a lot of dead tanks.

On the Tabletop: The best thing you can do with lootas is to treat them like a Space Marine devastator squad; Find the highest point on the table, with the greatest fire lanes, and fire away! Be careful, however, that you target tanks as a priority, seeing as lootas are about the only unit in the ork codex that can reliably destroy armor 12 and under tanks.

Kommandos:

The oddball unit of the Ork codex, Kommandos don't seem to have a point. They aren't particularly good at tank killing, they aren't particularly good at killing infantry, and they aren't troops. Sure, the fluff is cool, but they just don't seem to have a point.

On the Tabletop: If you must take them, the very least you must do is to giv ethem a Nob with a power klaw, a burna, and hold them in reserve to outflank. Then, you head straight for the most important unit in the backfield, say a Manticore that has been bugging you, and give it a ride to orky hell, courtesy of the power klaw.

Eldar HQ Choices (part 2)

So, part 2 in the post series about Eldar HQ. This one will take a look at the Phoenix Lords. The Phoenix Lords are immensely awesome and crazy, with some serious killing powerwith S4, T4, 3 wounds, 4 base attacks, 2+ save, initiative, weapon skill and ballistic skill 7. They are also fearless, eternal warrior, and make their unit fearless. In addition to this they all have tons of cool little toys.
With this epic statline, you're probably like "But Kasrkar, why aren't ALL Eldar players running these guys?!"
The sad, sad reason, is that most of them lack an invulnerable save. They are also about 200 points each. I've had some good fun with them, though, and I'm sure I'm not the only one.
Let's start with:

-Asurmen- Well known as the least versatile and probably worst Phoenix Lord alive, and the leader of the Dire Avengers. He has both defend (all enemy models fighting against his unit have -1 attack) and bladestorm (+1 shot on each gun in his unit, but they can't fire next turn). He also is the only Phoenix Lord with an invulnerable save (4+), which is pretty much his only perk against the other Lords. In close combat, he pretty much has a power sword that re-rolls misses and can inflict instant death. Doesn't seem too bad, right? Well...he's 230 points. Way too much in my book. Probably the 6th best of the 6 Phoenix Lords. -Baharroth- So basically, Baharroth is pretty bad. Maybe not as bad as Asurmen, but just maybe. He has all the wargear of a swooping hawk, (he's their leader) and he has a power weapon. That's about it. Other then giving his unit hit and run, he has a cool S5, 3 shot gun. Not much to say about him. He's fun, but not worth 200 points really. He DOES have a cool model, though. (shown below)
-Maugan Ra- The leader of the dark reapers, Ra is actually not that terrible. He has acute senses, and a really neat gun that can either have an extra shot, or re-roll to wound and ignore cover. His gun also has a S6 power weapon on it...so yeah. Now more about his gun, its S6, AP5, and has 4 shots. It is also rending, and pinning with a 36" range. He's also one of the only Phoenix Lords under 200 points at 195! I would actually consider taking him if you need some long range and you don't have your HQ picked out yet.

-Fuegan- Basically, he's a pretty awesome Fire Dragon exarch. He has a S9 AP1 meltagun with 18" range that ignores cover, too, so that's nice. He also has feel no pain, making him slightly more survivable against weapons that don't ignore his armor. He also has S5, and attacks as a monstrous creature. That means he's ignoring armor and rolling 2d6+5 for killing vehicles in close combat. He's good, but I wouldn't take him since he's 205 points and probably won't do a whole lot.
-Karandras- This guy is actually pretty good. He and his unit have infiltrate, move through cover, and stealth. He also has a whopping 7 S9 power weapon attacks on the charge. He and his unit of Striking Scorpions could probably do a lot of damage. At 215 points, I would actually consider using him if you have some striking scorpions, and like to sneak around.

-Jain Zar- She is the cheapest Phoenix Lord at 190 points, as well as the Howling Banshee leader. She is pretty amazing in close combat. I've actually taken her before, and she did a lot, including killing the Emperor's Champion before he could attack, as well as dicing up a handfull of marines. With furious charge, she gets 5 S7 power weapon attacks at I10. She also has a 3 shot throwing weapon with S5 AP2. Not too bad, I would actually consider using her again if I had 190 points laying around.

Well that concludes part 2, I hope I've informed you of the Phoenix Lords and their sad points cost. Part 3 will be coming soon.

Wednesday, November 3, 2010

Eldar HQ choices (part 1)


Today, I bring you yet another Eldar post. This will be the first of the posts about HQ in the Eldar codex. I will not be covering the Phoenix Lords yet. They deserve a post of their own. So, let's begin with the most well known and popular HQ choice...

- The Farseer: (Shown above)
Now, with a typical 'commander' statline, the farseer may not seem very special, other then the witchblade and 4+ invuln save. He is only 55 points, but this quickly adds up to around 150 as you give the farseer the wargear he needs. The Farseer is special in that you can give him as many of the multiple psychic powers available as you want. a few of these powers include: fortune (re-roll all failed saves on a friendly unit), doom (re-roll all failed wounds against a single enemy unit), guide (re-roll all failed hit rolls in the shooting phase against a single enemy unit), and eldritch storm (a S3 large blast template that is pinning). Able to use up to 2 powers per turn when upgraded with spirit stones and ride a jetbike, the farseer turns into the greatest support HQ in the Eldar codex, and possibly the game. My favorite layout, coming in at 155 points is the following: Farseer with runes of warding, runes of witnessing and spirit stones who knows doom and fortune. Probably a 4/5 on the usefulness scale.
- Eldrad:
Eldrad Ulthran is a special character farseer. He is very similar to a regular farseer, but with a lot of subtle upgrades. He has +1 toughness, a power weapon that wounds on a 2+, may use 3 powers per turn, and knows all psychic powers available to a farseer. He also allows the eldar player to redeploy D3+1 units before the game starts. I take him in almost every game I play, despite his 210 point pricetag. In my eyes, he is worth every point. A 5/5 on the usefulness scale. Not kidding, this guy works miracles.


- The Autarch: (Shown above)
The autcarch is a typical HQ. He has a really awesome statline, and can get equally awesome weapons. Other then adding +1 to your reserve rolls, he doesn't do anything for the army. All in all, he can have like a bajillion power weapon attacks, as well as a meltagun, so I can't complain. This guy can also ride a jetbike. This guy is able to get so many options, I won't even make an example. Basically, he can take any weapon in the Eldar codex that isn't heavy, and have any transportation method. A 2/5 on the usefulness scale.

- Yriel:
Prince Yriel is another special character. He however, is the autarch version. Basically, he is 155 points I believe, and has a few more tricks then a regular autarch. For one, he has a power weapon that wounds on a 2+ and counts as S9 against vehicles. Oh, he also has 4 base attacks. That's pretty much it. He can also choose to put a large blast template over himself instead of attack. S5 AP3 or something. This guy is pretty much a one-trick pony. He's good in close combat, and not really anything else. I've never taken him, and I'm not saying not to take him, but I think I'll stick with Eldrad. 2-3/5 on the usefulness scale.


-The Avatar of Khaine: (Shown above)

So basically, this guy is awesome. First of all, he's a monstrous creature. If that doesn't say enough, he's Weapon Skill 10, S6, T6, has 4 wounds, a 3+ save, 4+ invuln, has a meltagun, I6, and oh yeah, he only makes every unit with a model within 6 inches fearless. Able to wipe out entire units of space marines and their transport without getting hurt in return, and basically making an entire army fearless, you'd think this guy would be super expensive, right? Nope, hes 155 points. The same price as Yriel. Easily one of the best options in the codex, I highly suggest taking this dude. There are 2 down sides. The first is that the model is pretty stupid, the second is that you can only take one. Probably a 5/5 on the usefulness scale due to his cheap cost. He will likely make his points up to you every game, in addition to saving your guys from running off of the table.

Hope you enjoyed this post. If I don't forget like I did with my last post series, the next Eldar HQ post should cover the phoenix lords.

Monday, November 1, 2010

Ork tactics (Part 2 of 6): Ork HQ

Hello again, folks! Today, for part two of the ork tactics series, we will look at the Ork non-special HQ.Warboss:

The Warboss is probably one of the most versatile choices in the game. Not very often taken, they are still a little gem of an HQ. The most popular configuration for a Warboss, when taken, is generally in Mega armor, making him a lot harder to kill, and if you want to splurge, you could also get him a Cybork body, to save him from those nasty Sergeants with powerfists, or power weapons squads.

On the tabletop: Usually, they are used as close combat support, and with their ability to make a single Nobz or Meganobz squad troops, a popular tactic is to have a Warboss in mega armor with a unit of 5 or so Meganobz just slaughter their way to an enemy objective, and dare them to try and take it from them.

Big Mek:

Probably the most commonly seen Ork HQ, these guys are very versatile as well. Their versatility, however, lies in their ability to be defensive, making them the polar opposite of the more offensive Warboss.

A popular configuration for the Big Mek is to give him an expensive Shokk Attack gun which, as well as being entertaining as heck, is also very effective at taking out large units, due to the 5" blast. This seems obvious, but it bears repeating, seeing as people now tend to focus on destroying vehicles. Another thing you can do is to give him a Kustom Force Field, and then put him in the middle of your Battlewagon wall, to help protect against all those melta/lance weapons that seem to be everywhere nowadays.


Weirdboy:

Not a very good choice, overall, simply for his unpredictability. Upgrading him to a Warphead lets you control him a little, but they are simply too unpredictable. They have some close combat ability, and they aren't super expensive, but still...

On the tabletop: Again, I personally wouldn't take one, but if you are willing to take a bit of a risk, then some of the powers he has access to are pretty useful. Nothing puts an enemy in his place like 30 shoota boyz teleporting behind their prize unit.

Commissars: How to use them and how NOT to use them

Hey Folks!
It seems lately that a lot of people have been having problems using commissars...
Commissars have one purpose in my eyes. That purpose is to keep your silly little guardsmen from running straight off the table if something scary is within a 50 foot radius of them. Commissars also ensure that your 50 man guardsman squad doesn't get cut down as they run away.
So, let's take a glance at the commissar rules, shall we?
Basically, leadership 9, 1 wound, 2 base attacks, 35 points. He also gives his squad stubborn. If you fail that stubborn leadership test, he shoots the model with the next highest leadership value, and you can re-roll the test. A lord commissar has the same stuff, but leadership 10, 3 wounds and 3 attacks. However, the lord commissar is also an independent character, where the regular commissar is an attachment to a squad...
Now, that is one of the main reasons to never ever take a lord commissar, they can get picked out of a unit. They are also 70 points base, with no upgrades.
Now, you can only take a commissar in a platoon command squad, or an infantry squad. Never take one in a PCS, because he will end up shooting your platoon commander, and not really doing anything. The key to regular commissars is putting them in a 30-50 man combined infantry squad. Here is an example:
-50 guardsmen, 5 autocannons, attached commissar
This unit comes in at about 335 points for 51 dudes. It will toss out LOTS of shots, and won't completely crumple in the assault. This is the only place to use a regular commissar, and probably a commissar in general.
The only place to use a lord commissar would be with ogryns probably, which we all know sorta' suck.
-Diagnosis:
-Regular Commissars: Use them in giant infantry squads. Anywhere else they are just a waste of points.
-Lord Commissars: Don't even bother. All the enemy has to do is throw a single S6 attack at this guy and he dies. Then your entire squad of whatever he was with runs off the table, costing you 2 kill points.

Sunday, October 31, 2010

Ork tactics (Part 1 of 6): Special HQ

Hello, everybody, and welcome to my first post in about 2 weeks. This is the first part of a series on Orks, which I will write over the following weeks. Orks have always been a competitive army, and extremely fun, to play. Here I will focus on their Special Character core.


Ghazghkull Thraka:

Ghazghkull is arguably one of the best HQ in the game. On the charge, he is nearly unstoppable, with 7 Strength 10 attacks. My brother regularly takes him, and he has never failed to impress. On the outside, he looks good, right?

Well, he has one special rule that makes him invaluable for Ork armies: Ghazghkull's Waaagh! This is a version of the normal Waaagh!, declared in the shooting phase, etc. What is different about it is that, instead of rolling for your fleet of foot, every unit with the Waaagh! special rule moves 6" automatically. As if that weren't enough already, Gazghkull's 2+ armor save becomes Invulnerable while on a Waaagh! making him truly unkillable. Add this to eternal warrior, furious charge, and a Big Shoota, and a points cost of only 225, he is truly a force to be reckoned with!

Using him on the table top: It has been found that the most effective way of deploying him is in a Battlewagon, to make up for his Slow and Purposeful, with a unit of Meganobz. Use this unit to utterly tear apart that pesky 500 point Deathstar unit, with your own, better Deathstar unit.

Mad Dok Grotsnik:

At first glance, the Mad Dok is a little hard to justify, being, basically, a painboy with an extra wound, an extra pip of toughness, another attack, WS 5, and a price tag of 160 points. He comes with the usual, slugga, 'urty srynge, dok's tools, and the rest, but when you look at his special rules, he is revealed.

He has a modified version of Rage, except for the fact that you can't control it by having him out of line of sight of the enemy. However, he can be joined to any unit, and for 5 points per model, he can give them Cybork bodies, which I would not recommend, as it is way too expensive.

Using him in a game: If I were to ever take Grotsnik, it would be with a 19 strong mob of Ork Boyz in a Battlewagon. Seeing as he is a little bit of a loose cannon, I would simply let him and his unit loose in the middle of the enemy's battle line, and watch as he runs over everyone, for 19 Ork Boyz with Feel No Pain is not to be scoffed at! However, with this in mind, I would probably not choose to take him, simply because there are better options out there.


Wazdakka Gutsmek:

Wazdakka Gutsmek, The Biker of the Aporkalypse, or in other words, complete awesome. Without doubt one of the best characters in the Ork army list, he is able to turbo-boost, and still fire 4 Strength 8 shots making him a rather amazing tank killer. Add this to the fact that he has toughness 6, is on a bike, and has a Powerklaw, he is amazing for only 180 points.

His main power, however, is to make all Warbiker Mobz troops. This means that you could potentially have an army of super fast troops, supported by a couple of looted wagons, some boyz in trukks, and warbuggies. This sort of an army would hit really, really hard, and be super mobile, just how Orks like it!

On the Tabletop: In a battle, though he has 4 attacks, and a Powerklaw, I would highly advise against throwing him in combat, simply because he is better just simply shooting things! Putting him with a small unit of 5 or so warbikers ensures that he will not be sniped by a railgun or some such thing.


Old Zogwort:

Probably one of the most hilarious units in the Ork codex, Old Zogwort is a Psyker, rolling on the Ork Psychic powers chart, and he is a Warphead, meaning he can re-roll the result. He is also better in combat, getting an additional D6 attacks at Initiative 4, and all attacks are poisoned that wound on 2+.

You still might think, "Wait a moment now, this isn't good enough for 145 points! You're almost as stupid as your name, Verderer!", and you would be excused for saying that. What makes Zogwort all that is that the can turn enemy characters in to squigs, sort of like a weak version of Gift of Chaos. This may not be the best power ever, but is certainly good for a few laughs.

On the Tabletop: Despite all I have said about Zogwort, he is not the best option in the Ork codex, at a few too many points for what he does. If you were to use him, I would probably put him in a Battlewagon with 19 Shoota Boyz. As with all Ork psykers, he is way to unpredictable, and I like my troops to be very dependable, aka entire army fearless.

Saturday, October 30, 2010

Eldar Aspect Warriors

Hey, folks!
Time for another post. So why not a big one? With pictures?
Anyway, this will be about aspect warriors. What they're good at, good formations of them, etc.
So let's start off with the bad boys pictured above.

-Dire Avengers: All in all, a good unit. At 12 points per model, with a few sexy upgrades and a moderate statline, I really can't complain. Dire Avengers are known for not sucking in close combat OR shooting. Frankly, they are better at shooting, but with the proper layout, they will do ok in the assault. They are, however, slightly killable at T3 with a 4+ save. A nice thing about them is, their guns can have 3 S4 shots each, meaning they are good for killing hordes, but not so much vehicles. They are also troops, which is nice. A good layout, coming it at 152pts, is 10 Dire Avengers, one is an exarch with 2 catapults, who also knows bladestorm. This means 22 shots per turn or 32 shots every 2 turns.

-Howling Banshees: A very specialized unit. You want these girls hacking away at stuff with a 4+ and better save. In case you aren't sure why, it's because every single one of these gals has a power weapon! Their free masks also make them initiative 10 in the first round of combat. They are, however, S3, so a full 10 or a support farseer casting doom is required for the enemy to feel the full fury of Banshees. At 16 points per gal, and only as survivable as Dire Avengers, I suggest a transport or heavy cover for them. Also, I've found that they make excellent retinues for a farseer. I suggest taking a bare 10 gal squad, with a possible upgrade or two if you have the points.

-Fire Dragons: A wonderful unit in my experience. 16 points per model, same statline as a banshee or avenger. These guys, however, are each carrying a fusion gun and meltabombs. This means that they can blow up tanks without even trying. I'll also note that a S8 AP1 gun will kill space marines and equally tough foes with ease. They will attract a lot of gunfire, so don't leave them exposed, and try not to get them into close combat with anything stronger than imperial guardsmen. As far as upgrades go, don't even bother. These little fellows are great no matter how little points you put into 'em. Also, one of the more versatile units in my opinion. You have to play them to realize this, though. I know that melta weapons don't seem too versatile at first glance...

-Striking Scorpions: I haven't looked into these guys too much, but they work alright. They are geared for close combat, and have the same statline/points cost as a howling banshee. However, they have a 3+ armor save over the banshee's 4+ and no power weapon. They do have free wargear that grants them both +1 attack and +1 strength, however. They can also get a few toys for close combat like a power fist, or even buy the ability to infiltrate. These guys excel at killing units with poor saves such as massed imperial guardsmen or orks. With a better armor save, these guys are actually quite tough, too. The higher strength also lets them glance vehicles possibly. These guys appear to be a more versatile version of howling banshees, but they have a smaller chance of killing a lot. They aren't that nail-biter unit that the enemy is afraid of. (That can be good or bad.)


-Dark Reapers: Again, not much experience with this unit. Oddly taking up a heavy support option, you'd expect these guys to be hard-hitters. Nah, not really. They look good, with a 2 shot, 48" range S5 AP3 weapon and a 3+ armor save. However, the points cost kills them. They are 35 points per model, more than double the cost of a scorpion, banshee or fire dragon. You can also only have up to 5 man squads. Overall, their guns won't hurt vehicles that much (if any), and they aren't even AP2. It's easy to tell that these guys were meant to kill space marines. However, a 5 man squad will kill 4 marines on average per turn. That's 64 points worth of kills, while the unit costs 175 points. A one-trick pony in my opinion, and not even slightly worth it unless you know you're going up against space marines. Even then, probably not worth it.

-Swooping Hawks: Pretty interesting unit, actually. Same statline as a dire avenger, but with a jump pack, and 21 points per model. The guns aren't very good, S3, AP5, assault 2, 24" range. I don't think GW made this unit with guns in mind though. They have haywire grenades, which are amazing at messing up vehicles at close range. They also deep strike, and can go back into reserve once in play. Whenever they deep strike, they place a large blast template with S4 AP5 anywhere on the table. This unit appears to be ideal for distraction and annoyance. However, this unit probably isn't worth it unless you base your army around helping their effectiveness. It is a very FUN unit, though, and I've enjoyed all of the games where I used them. This unit gets an A+ for bringing fun back to the game.


-Warp Spiders: 22 points per model may seem like a lot, but I absolutely love these guys. They are very fast, deadly to any kind of unit, tough, and they don't fold in the assault. Now, when I say fast, I mean that these guys can move 30" per turn possibly. There's a very slim chance that you will move 30, but the average movement is 22-23", which is still very fast. Now, their guns are downright great. Short range, but they are S6, AP-, assault 2. Yeah, they don't pen armor, but they are high strength and multiple shot. 10 of these guys could probably rip through any kind of unit, including vehicles. I've had 3 of these guys wreck a rhino before. You can also give their exarch a power weapon, that, thanks to a hole in the rules, gives him 5 attacks on the charge. This and a 3+ armor save makes them ok in the assault. Throw these guys against any reasonable situation short of a land raider, and they will rarely fail you.

-Shining Spears: These are hit or miss. They are Pretty darn tough, hit hard, and move fast, but they aren't cheap, and overall are easier to wipe out than a 10 man unit of spiders. They are T4 with a 3+ save, making them as durable as space marines. They also have a lance that counts as a S6 power weapon. Now, this is amazing, but you can only take squads of 5, and they are 35 points each without upgrades. While these guys hit hard, they fold to power weapons, just like marines. Truth is, I'm not spending 35 points on a guy that will crumple under a squad with a power fist. Maybe worth it, but probably not. If you do end up taking them, send them at squads with good armor saves. They will do a lot of damage until the enemy freaks out and shoots them.

Now, I will rate the Aspect Warriors on which ones I think are the best. Note that I am judging them based around stand-alone preformance.
#8: Dark Reapers. These guys suck at everything but shooting space marines. They're too expensive, too.

#7: Swooping Hawks. The truth is, I really hate to put these guys at #7, but they're just too easy to kill for being 21 points. They are good at annoying units, and I've seen amazing things from these guys, but they just aren't reliable enough.

#6: Shining Spears. They kill stuff easily, but they aren't durable enough to be 35 points per dude. These guys would be way further down if they were 5 less points per guy.

#5: Dire Avengers. These guys are the worst of the best. Yes, they're cheap, but they can't reliably kill much without support. They also have pretty much no tank killing capability.

#4: Howling Banshees. These girls can be amazing as well as terrifying, but they just aren't very versatile. They excel at one thing, which is killing stuff with good armor. Still an amazing unit, though.

#3: Striking Scorpions. It was a close call between these guys and the banshees, but the math-hammer shows that these guys are more reliable when you don't know what army you're facing. They are also pretty tough to kill. Versatility is a very good thing to look for in Eldar units.

#2: Fire Dragons. An amazing unit. Not the most versatile, but they will kill pretty much anything if they're in range.

#1: Warp Spiders. A close call, but this unit is just too versatile to be topped by any aspect warrior. I'm not saying everyone should take these guys, but warp spiders are definitely versatile. They will preform amazingly in the hands of a skilled player.


Thanks for reading!

Sunday, October 24, 2010

Battle Report! Kasrkar vs. The Verderer!


G'day folks!
Today, I bring you yet another battle report, extra-dry style. This one, however, is slightly more special. I had the honor of facing off against The Verderer's chaos space marines with my eldar. This game was actually quite boring, but still fun, of course. Now, playing my eldar, (which I am not nearly as good with) my chances of victory were slightly lower. The Verderer is quite a good player, and is normally quite aware of my eldar tricks. Now, on with the battle report!
Mission = Capture and Control
Deployment = Dawn of War
My Eldar list:
-Eldrad
-5 Howling Banshees
-5 Fire Dragons
-5 Fire Dragons
-10 Guardians, 1 shuriken cannon platform
-3 War Walkers, 2 scatter lasers on each
-Fire Prism
The Verderer's Chaos list:
-Sorcerer, mark of Slaanesh, lash of submission
-9 Chaos Marines, 1 meltagun, champion w/ a powerfist, icon of Nurgle
-Rhino, extra armor
-10 Khorne Berzerkers, champion w/ a power weapon
-Rhino, extra armor
-2 Obliterators
-2 Obliterators
The table had city terrain scattered all about it. Enough to negate some line of sight and give a lot of 4+ cover saves. He wins the roll to go first and passes the first turn to me. I place my objective behind the wall of some ruins on my left side of the table. He places his behind some ruins on my right side of the table.
Deployment: I put 2 squads of guardians as far up as I can near his objective. I was attempting to get him to put some units on that side of the board to deal with them. He expects trickery, and puts his entire army in reserve. I then use Eldrad's divination rule to redeploy the guardians behind the wall in front of my objectives.
-Top of turn 1: My army comes in. I deploy in layers around my objective to give all of my units cover saves. 1 fire dragon squad goes to each side of the wall, the war walkers deploy centrally to have a wide field of fire.
-Bottom of turn 1: Nothing happens.
-Top of turn 2: I turbo-boost my fire prism to the left for a cover save after fotuning it, I also fortune the war walkers and Eldrad's unit. I brace myself for obliterators to shoot at me.
-Bottom of turn 2: His 2 squads in rhinos come in, but neither of the obliterator squads show up. He deploys both rhinos next to his objective, only the rhino with his sorcerer is visible to me.
-Top of turn 3: I fortune my war walkers, fire prism and Eldrad's banshee unit. I sneak forward with both of my fire dragon squads, knowing that he wouldn't shoot them over my troops and heavy supports. I also move the war walkers out and screen them with the banshees. After measuring, I find that only a single war walker can see his one visible rhino. I blast it with my 8 guided shots. Despite only hitting with 5, I still manage to penetrate twice, and wreck it.
-Bottom of turn 3: Neither obliterator squads show up. His sorcerer splits from the nurgle chaos marines as they move deeper behind the ruins next to his objective. His berzerker rhino stays out of my sight.
-Top of turn 4: I fortune up the war walkers, and the fire prism once again, as well as guiding the walkers. The fire prism rolls 12 inches behind a large tower in the very middle of the board. My war walkers, banshees and dragons advance. The war walkers fire their weapons at the nurgle marine squad, choosing to ignore the nearby sorcerer. They can only see a single marine through a window, but they somehow manage to kill 3 after The Verderer rolls well (for once) on his saves. Unfortunately for me, he makes his leadership check. My fire prism, able to see a single tread on the berzerker rhino, takes a shot. It hits, The Verderer fails his cover save, but I roll a 1 to penetrate.
-Bottom of turn 4: Both obliterator squads come in. 1 squad is unable to see anything but my guardians, (who are about 40" away) so they take lascannon shots. He causes a single wound, no cover since he can see half the squad. With the loud utterance of "Going to ground, biatch!" I make my 6+ cover save. The other squad of obliterators blasts at my fire prism, hitting once, then rolling a 1 to penetrate. Across the table, his sorcerer attempts to use lash of submission on one of my distant guardian squads, only to find that he is about a foot out of range. After realizing that he forgot to move his marines, he runs them so that they are out of line of sight of my war walkers.
-Top of turn 5: In addition to forgetting what turn it was and forgetting to move into contesting position with the prism last turn, I utterly fail and don't use any of Eldrad's powers. The prism zooms into contesting position this turn, I pray that the game continues. Since I didn't use any powers at the beginning of the turn, I use mind war on the sorcerer, who is now about 16" away. I fail to deal a single wound. With no other targets, the war walkers blast the sorcerer. After the barrage, nothing remains of the sorcerer but his shiny little power boots. One of my fire dragon squads continues to sneak through ruins towards The Verderer's obliterators.
-Bottom of turn 5: The berzerker rhino continues to hide out of my sight. Still ignoring my fire dragons, the obliterators open fire on my fire prism. 2 lascannons penetrate the armor of the fire prism, and despite shooting a turbo-boosting tank through 2 buildings, I only make a single cover save. The Verderer, however, only rolls a 1 and shakes the prism. I roll to see if the game goes on...a 4! It continues.
-Top of turn 6: Yet again, I completely forget to use any of Eldrad's powers. The fire prism moves about 16" and contests the chaos objective. The fire dragons that The Verder had been ignoring the whole game open fire on one of the obliterator squads, killing both. I'm unable to do anything else...
-Bottom of turn 6: Obliterators find their angles, marines prepare to strike, and the khorne berzerkers finally leave their rhino to assault the fire prism contesting their objective. The obliterators open fire first. They manage to immobilize it. His meltagun misses. Finally, his last chance. He assaults with his chaos marines. His only power fist hits once, penetrates, and he rolls yet another 1 to shake the crew. The rest of the marines attack, failing to harm my prism. Finally, the berzerkers attack, (you will notice that we oddly did attacks in the opposite of initiative order) with a whopping 41 strength 5 attacks. Even with all that, he only manages 2 glancing hits, both of which only manage to shake it again. If the game ends, I will claim victory. A 3 is rolled by The Verderer, and the game ends.
While we both had our fair share of bad rolling, I had better. I didn't lose a single model, but this is mostly because he didn't have a lot to shoot with (and a really awesome 6+ cover save). When it came down to it, It was a very close game. I think that my agressive/tricky deployment and spammy army list helped me secure the game, though. He never came within 24" of my objective, probably, and he was forced to play his offensive army defensively. Overall, it was good game, and very close. My Eldar preformed admirably, and so did The Verderer under the circumstances he was given.

Sunday, October 17, 2010

Battle Report! Eldar vs. Blood Angels (1500pts)

(Blurry dreadnoughts FTW)
Hey folks!
I got in some 40k today with possibly my favorite foe. Seriously, I enjoy every game with this guy. It's always a close call, especially when he uses his blood angels, for I have never seen someone use them so well. Anyway, it's time for a battle report!
I decided to use my eldar for once. Now, my eldar have never played over 750 points, and I am relatively new to them. I had a feeling that in my game against my friend's speedy marines, one of us would get completely decimated...
Now, here are the lists!
Eldar:
-Eldrad Ulthran
-6 Howling Banshees, 1 exarch w/ an executioner, counter attack
-Wave Serpent, shuriken cannons
-9 Fire Dragons
-Wave Serpent, shurken cannons
-5 Rangers
-5 Dire Avengers
-8 Dire Avengers, 1 exarch w/ 2 catapults, knows bladestorm
-5 Warp Spiders, 1 exarch w/ 2 death spinners
-3 War Walkers, each has 2 scatter lasers
-Fire Prism
-Wraithlord, shuriken cannon/scatter laser
Blood Angels:
-Librarian, storm shield, terminator armour, blood lance, sanguine sword
-5 Assault Terminators, all have thunder hammers/storm shields
-Sanguinary Priest, terminator armour
-5 Assault Marines, no upgrades
-Razorback, TL lascannon
-5 Assault Marines, no upgrades
-Razorback, TL lascannon
-10 Assault Marines, 2 meltaguns, 1 powerfist, jump packs
-Land Speeder, multimelta
-3 Bikes, 2 have meltaguns, 1 has powerfist
-Baal Predator, TL assault cannon, 2 heavy bolters
-Vindicator, siege shield
So, we rolled for mission and deployment...
Annihilation, Dawn of War. He won the roll off and decided to go first. He then chose to reserve everything. I copied this move, not wanting to take the first casualties (which I still would). The battlefield had random rubble and ruins scattered across it. In the center of my table edge, there was a large, abandoned ruin. This ruin would be my main deployment area.
Top of turn 1: Nothing happens.
Bottom of turn 1: Nothing happens.
Top of turn 2: His baal, vindicator and land speeder come in from reserve. His land speeder zips to the my left, his vindicator and baal deploy in the center and roll up.
Bottom of turn 2: My fire dragons, fire prism, 8 man avenger squad, rangers, warp spiders and wraithlord come from reserve. I deploy all of my infantry behind the large ruin in my deployment zone to prepare for his boys to rush me. My prism and fire dragon wave serpent deploy behind some rubble on the left side of my table edge. The wave serpents turbo-boosts over to the side of the ruins and turns sideways to block any visible infantry of mine from LoS. Thanks to night fighting, none of my shots hit.
Top of turn 3: The rest of his army shows up. He throws his jump pack squad behind his tanks to prepare to roll up. He deep strikes his terminators right beside the ruin that has my guys behind it. His land speeder rushes up to help to terminators. His baal kills a single ranger with its heavy bolter.
Bottom of 3: Eldrad/banshees, war walkers and the other dire avenger squad come in. The rest of my army moves out from behind the ruins. The terminators are now surrounded by my entire army basically. I'm forced to load every single shot I have into the terminators. I manage to kill every member of the squad except for the librarian. I am forced to charge the librarian with Eldrad and the banshees. I cause 6 power weapon wounds to him, and he makes every single 3+ invulnerable. He swings at the banshees and misses completely. The score stands at
Eldar:2 BA:0
Top of turn 4: His vindicator, baal and troops move up a few inches to take advantage of my troops moving out. My infantry is still obscured from my wave serpent, though. His baal unloads its 10 shots on my warp spiders, who make every single save. The vindicator then lobs a shell right into the heart of my compacted mass of eldar. My fire dragons go to ground, and I lose 2 dragons. I also lose 2 warp spiders from the vindicator blast. The enemy land speeder lines up a rear-armor shot on Eldrad's wave serpent, immobilizing it. My other wave serpent is also stunned by lascannon fire. The librarian/Eldrad/Banshee combat continues. I cause another 6 wounds to the librarian, finally killing him. I make my 1 inch consolidation move with pride.
Bottom of turn 4: My infantry runs back behind the ruins for safety, except for the warp spiders, who dash towards the land speeder. My wraithlord also lumbers from behind cover to face a razorback that has gotten too close to my ruins. The prism finds a nice little gap in the ruins it's hiding behind, which it can shoot through. Now, the shooting phase. The warp spiders zapped the land speeder, managing 5 penetrating hits and wrecking it. The wraithlord then unloads its heavy weapons into the closest razorback, blowing it up. The war walkers, who are covering the retreating infantry, also manage to penetrate a razorback's armor 6 times and glancing it twice. My enemy makes 4/6 cover saves on the pens, and 1/2 of the cover saves on the glances. The results are an immobilize and 2 weapon destroyed, which means a wreck on the razorback. To cap it all off, my fire prism makes the shot of the day, hitting the vindicator's side armor through a gap in some ruins from about 50" away. The vindicator then exploded and killed a marine or two. The score stands at Eldar:7, Blood Angels:0 with most of my forces now behind the ruins again.
My foe ran out of time and was forced to throw in the towel.
Victory, Eldar!
Overall, my enemy had the advantage of range and a newer codex, but he wasn't accustomed the playing against eldar, and that's why I won probably. He was also trying to go quickly because he had to go as soon as possible. Still, I am proud to say that I won this game by using eldar sneakiness and eldar trickery alone.

Building an Uber-army

I'm sure all of you (as long as you aren't extreme noobs) have heard of such deadly army lists as the Alpha-strike, the Leafblower, and The Kult of Speed, and I'm also sure that some of you have no idea how to construct an excellent tournament list. Well, today, I will help you on your way to becoming the next Phil Kelly, aka, being able to win games at will. There are three schools of thought on how to make a competitive tournament list. The first one is the way that most gamers in Europe tend to use, which is achieved by getting, in every unit, the best value for your points. Such as, if you need tank killing, and you can get a land raider, or a squad of devastators with missile launchers. Both would be about the same in effectiveness (using mathhammer), but the Land raider is considerably more expensive. There, problem solved. The second way is a tactic used mostly by players in the US, and is much more straightforward. It relies on getting about a million super units, to act as wrecking balls, that tear through the enemy army in an unstoppable tornado of las-bolts and chainswords. These types of armies rely heavily on such units as Nob bikers, Thunder Hammer/Storm Shield terminators, and the like. The third and final way to do it is my favorite, and probably the best, as well as being the most fun. The third choice is to find a special character in your army list who gives your army some special ability or other, or makes certain unit types better, or troops, and them milk him for all he is worth. I have several examples for this. Take Sammael, from the Dark Angels codex, for instance. He is a pretty good character, and can be put in a 14 14 10 land speeder for free. But his main ability is to make all Ravenwing attack squadrons become troops. If you choose to base an army around him, you will have a small but elite force of bikers and attack bikers, all able to capture objectives, and all able to make use of the Outflank rule, thanks to the Scout special rule. It will also be extremely hard to kill, with each of the scoring models having toughness 5. Another example is another Space Marine character: Vulkan He'stan. By taking him, all flamers, heavy flamers, meltaguns and multi-meltas become twin-linked, and all Thunder Hammers become master-crafted. Due to the amount of mech in 5th edition, having all meltaguns twin-linked for free is practically to good to be true. The rest of the army them becomes very easy to build: Thunder Hammer/Storm Shield terminators, melta-maxed tactical squads, and multi-melta/heavy flamer land speeders. So you see, not too hard to make a good army list. Even if you aren't Space Marines, there are plenty of other characters that benefit your army, such as Epidemius for the Chaos Daemons, Wazdakka for the Orks, etc. Well, that's all for today, see you all soon, and may your dice ever roll 6s!

Saturday, October 16, 2010

Imperial Guard Veterans


Hey, folks!
It's been a while since I posted anything, and I apologize for that.
Anyway, I figure I'll try to get back into posting more commonly with an extra-long article about the best of the worst. The Imperial Guard Veterans.
In the Imperial Guard 4th edition codex, when everything died a lot and sucked horribly, there was one unit that the guard player could always count on. That unit was the Hardened Veterans. This unit stood out in the terrible 4th edition codex because not only did the Hardened Veterans have a BS of 4, but they could have up to 3 special weapons, as well as a single heavy weapon. Now, unless you are pretty darn new to 40k, you should know that 3 special weapons is no joke. That can be a very excellent amount of firepower if used correctly. Now, I can honestly say that every single guard player I knew had a squad of these boys for the extra meltas, plasma guns or flamers. However, there were several drawbacks that prevented this unit from being completely amazing. The first, is that veterans were (understandably) in the elites section. The second, and most painful drawback, is that a player could only have a single squad of Hardened Veterans. With this, the Imperial Guard codex continued to be terrible for a long while.
In May of 2009, when the 5th edition codex came out, Imperial Guard players noticed that Veterans were now a troops choice, and there was no 0-1 limit. In addition to this, Games Workshop decided not to nerf the Veterans unit in any way, but reduce the cost of each model instead. With this, veterans basically took over the Troops portion of the Imperial Guard force organization slot. After over a year, people still mostly ignore platoons of infantry and penal legions.
Now, lets go into the unit and the upgrades it can take...

-They can all take shotguns (I wouldn't. First Rank, Fire! Second Rank, Fire! is too magical to waste.)
-One can have a vox for 5 pts (That would be a no as well. Vox casters used to be great. Now they suck. 'Nuff said.)
-Up to 3 can have special weapons (This means flamers, grenade launchers, snipers, meltaguns and plasma guns. Always spam out on special weapons. This is the most valuable part of the veteran squad.)
-Can have a heavy weapon team (Mortar, missle launcher, lascannon, heavy bolter or autocannon. Not as mandatory as the special weapons, but it can boost your firepower a bit.)
-Squad can have carapace armor for 30 pts (Too expensive. Maybe if you need to fill up points.)
-Squad can have camo-cloaks and snare mines for 30 pts (Again, too expensive. Your guardmen will die, and this won't help that much.)
-Squad can have meltabombs and a single demolition charge for 30 pts (Still expensive, but possibly worth it. If you have 30 extra points, get this.)

Now, for the final part of this article, I will go over my favorite layout for the Veteran Squad.
I always take mine like this, atleast 3 squads:

10 man Veteran Squad, 3 have meltaguns, 2 form an autocannon team. In a chimera transport with a multilaser and a heavy bolter- 165 pts

With this layout, you can sit back and blast the enemy with 8 medium strength shots per turn. Between the multilaser, the heavy bolter and the autocannon shooting from the hatch, you will be able to water down heavy infantry squads, decimate light infantry, and even destroy light transports. The best part, when the enemy begins to close in, you can roll up the chimera and blast them with your 3 meltaguns. Those 3 meltaguns will easily blow up any tank, and easily finish off a squad if it had already been weakened.
There you have it! A cheap, amazingly versatile gunboat basically.
Hope you enjoyed this article, I will be posting more from the IG and Eldar codex soon, hopefully.
Happy hunting!

Thursday, October 14, 2010

Chaos Space marine psyker tactics (part 2)

For the last article in the Chaos Psychic Power tactics series, we will look at the 3 special characters in the Chaos army list that can use psychic powers. First, on Chaos spacial characters in general. They are generally pretty good in all size of games (Well, except for Abaddon the Despoiler, but I have heard that he is utterly beast in 'Ard Boyz size games, and Arhiman, which we will discuss later). So, here they are:


Typhus, Herald of Nurgle

Apart from having an amazing name, and a cool model, Typhus is rather awesome in game terms. He has the Manreaper, a weapon that is both a Nurgle Daemon weapon (Poisoned wounding on 4+) and a force Weapon, meaning that he will be able to kill most anything. He also has the psychic powers Nurgle's Rot and Wind of Chaos, one of which he can use, and then still use his force weapon in the Assault phase. He also does not have to take Psychic tests when using these two powers, making him even more worth his 225 points. So, how to use him. There are two things you can do with him: You can deepstrike him, with some other Chaos terminators with the Mark of Nurgle right next to a horde, and then use Nurgle's Rot to full effect. Then you have to tough out a round of shooting and assault, which shouldn't be hard, with 4 wounds, toughness 5 and feel no pain. The other way you can use him is to put him and 4 Nurgle terminators into a land raider, and then just run them towards the enemy as fast as possible. I know this sounds risky with all the meltaguns that are going around nowadays, but with a little luck, you can get into combat before the enemy has a chance to shoot.


Ahriman, Exile of the Thousand Sons

Possibly a little weaker in combat then Typhus, Ahriman is still a solid choice. The same statline as a Chaos Sorcerer, but with a bolt pistol that fires inferno bolts, and can use up to 3 psychic powers per turn. He also has all of the Chaos Psychic powers, except for Lash of Submission and Nurgle's Rot. This means that, in a game, he will be able to use 15-21 psychic powers. Of course, this means a lot of psychic tests. I have seen Ahriman's head explode countless times, and even more when facing Eldar with Runes of Warding. He's also 250 points, but arguably a little weaker than Typhus. I don't know if I would take him, although a gamer I know takes him regularly, so I guess it depends on the person.


Huron Blackheart

Arguably the most popular of the three, Huron is also the most versatile. Although his main function is not that of a Psyker, he is technically one, because he has a familiar, who allows him to use the Warptime power. He has a chaos lord's statline, but a rather cool array of weapons, with a power weapon, and a power fist with a built-in Heavy Flamer, making him very nice against hordes. Add this to warptime, and you have a problem on your hands, especially as he is only 170 points.

Wednesday, October 13, 2010

Chaos Space marine psyker tactics (part 1)

So, for the second installment in the Chaos psychic tactics, we will look at the first 2 of the 5 models in the Chaos army that can use them.


Chaos Sorcerer:

A very nice unit, I usually lead my army with one. They are base 100 points, have a formidable statline, and have a good amount of Psychic powers to choose from. Some of the upgrades available are:

Terminator Armor: Pretty good option.
Daemonic mount: Only if you have a supporting unit with them.
Bike: Good.
Jump Pack: If you have raptors, why not?
Mark of Slaanesh: Definitely a good option, and only 5 points!
Mark of Tzeentch: Expensive, but gives him more protection, and doubles his psychic power output.
Mark of Nurgle: Very annoying to the enemy, also allows you to take Nurgle's rot, an extremely good power.
Plasma pistol: No way.
Meltabombs: If you have 5 points, why not?
Personal icon: Only if you have deepstrikers.
Familiar: Useful, and only 5 points.

I think that the best combo you can take is as follows:

Chaos sorcerer w/ Mark of Slaanesh, Lash of Submission, Meltabombs - 130 points.

Cheaper than most psykers, and with a Force Weapon and Initiative 6, I have used one of these to annihilate characters with impunity.
Daemon Prince

Arguably the best HQ choice in the Chaos codex, the Daemon Prince comes at 110 points base, with a completely beast statline, and the option to become a psyker. Some of the options:

Wings: Take these, you must have them.
Mark of Khorne: Extra attack, but keeps you from taking psychic powers
Mark of Slaanesh: Very cheap, and enhances the Prince very well. also can take Lash of Submission.
Mark of Nurgle: Slightly more expensive, but makes him all but immune to small-arms fire.
Mark of Tzeentch: About on par with the Mark of Nurgle, and also allows you to use and take two psychic powers per turn.

Here is the optimised Daemon Prince, as I see it.

Daemon prince with Wings, mark of Slaanesh, lash of submission: 155 points.

For the same points as an Eldar Avatar, you get a unit that can happily assault and enemy on turn one, by using Lash of Submission to pull them closer, and then using that 18" assault range to fly the rest of the way, and slaughter whatever is stupid enough to stand up to it. Known as the Lash Prince, an army list based around two of these monsters will go far in a tournament

Tuesday, October 12, 2010

Chaos Space marine Psychic powers tactics

For today's article, we will look at the Psychic powers available to the scions of the Ruinous Powers, and how best to use them in a game. To start off with, Psychic powers. Usually very powerful on the tabletop, if a little unpredictable. Many armies also have wargear that can negate the effectiveness of Psychic powers, such as Psychic Hoods, runic weapons, etc. But, if you look past all these caveats, they are quite useful, Chaos Space Marine ones more so than usual. Let's take a look:

Doombolt:

Cheap, and usually effective, Doombolt is a good option for Tzeentchians who have need of a second power, or if you know you will be going up against marines. There are, however, better powers out there, which explains why Doombolt is so rarely taken.

Warptime:

An excellent power for a mere 20-25 points. It's an especially good power for Daemon Princes, but useful for everyone. It allows you to reroll all failed rolls to hit and wound for the entire turn. A very tasty power for CC oriented character.

Gift of Chaos:

The most hilarious psychic power in the game, it has a chance of turning your enemy's most powerful character into a Chaos Spawn. This will hardly ever work, but there are several approaches to using this power. the first one is to use it again and again against the enemy's most powerful character, until you succeed in killing him. Alternatively, you can cast this on a model in a low-toughness, cheap unit, such as imperial Guardsmen, or Gretchin, and the Spawn will most likely slaughter the entire unit, or at least hold it up for a turn or two. It is a bit pricey at 30 points, but worth every one.

Wind of Chaos:

Pretty much a powered-up flamer, the Wind of Chaos can be useful. With a taemplate range, always wounding on a 4+, and allowing no armor saves or cover saves, it is a great marine-killer. In fact, I have seen this power wipe out entire marine/terminator squads in one shot. The one thing which keeps it from being more popular is the hefty 30 point price tag.

Lash of Submission:

Lash is widely considered to be the best psychic power in the game. I, personally, will not go into battle without at least one lash-wielder. It allows you to move an enemy unit 2d6 inches in whatever direction you want, potentially shoving a dangerous unit away from your army, bringing a unit into assault range, or bringing them into a tight mass, ready to be obliterated by a Vindicator or, well, Obliterator plasma cannons. All this for a mere 20 points.

Nurgle's Rot:

Another beautifully cheap and useful power, Nurgle's rot is the bane of all horde armies. Every model within 6" suffering a S3 hit? Can break the back of any horde with ease. For only 15 points, a total bargain.

Bolt of Change:

Last, but not least, comes the ever-popular Bolt of Change. Commonly seen on Thousand Son aspiring Sorcerers, this is a great transport killing power. With a moderately long range, high strength and AP 1, it will punch right thorough Rhinos, Chimeras, Trukks, you name it! A little on the high end of affordable for 25 points, still worth taking.

The next article will be on the Special Character psykers available to the forces of Chaos.

Sunday, October 10, 2010

Battle report: Chaos vs. Chaos


Vs.


So, for my first battle report, I will post a Chaos vs. Chaos battle that i fought against my friend Carter. I was going to take pictures, but about a turn in, the camera burned out, so I will have to simply describe it. So, the 1000 point army lists were:

The Host of the Eternal Rot (Carter)

Chaos Lord w/ Terminator armor, Mark of Nurgle, chainfist, combi-flamer

14 Plague Marines w/ Flamer, Meltagun, Aspiring champion w/ power weapon, plasma pistol

10 Chaos Space Marines w/ Icon of Khorne, Plasma pistol, flamer, Aspiring Champion w/ plasma pistol, power weapon. Rhino w/ Combi-flamer, daemonic possession.

Predator w/ Heavy Bolter sponsons, extra armor, combi-flamer.

The Warhost of Vashnaar the Tormentor (me)

Chaos Sorcerer w/ MoS, Lash

6 Khorne Berzerkers w/ Skull champion w/ Powerfist

6 Thousand sons and 1 Aspiring Sorcerer w/ Meltabombs, Gift of Chaos

7 Chaos Space Marines w/ Meltagun, Icon of Khorne

(x3) Rhino w/ Daemonic Possession

Vindicator w/ Daemonic possession

The Battlefield:

We were playing on a 4' by 4' table. in each table quarter area, there was a ruin, next to the ruin to my left was a forest, and to my right, in between two ruins, was a hill with 3 trees on it. There was also a moderately-sized ruin in the center.

Mission: Annihilation

Deployment type: Pitched Battle

Deployment: He deployed first, setting up his Plague Marines tightly packed behind the ruin to his left, his Predator in the center, and the Rhino full of Marines on his right. His Lord was held in reserve. My deployment was quick, seeing as I had a completely mech army. I deployed in an "L" formation between the forest and a ruin. The sorcerer deployed with the berzerkers in their rhino, in the center of the L. The CSM's rhino went to the left of the Berzerker's rhino, the Vindicator to the right, the Thousand Son's rhino behind the CSM's. I failed to seize the initiative.

Turn 1:

In Carter's turn, the plague marines stayed where they were, the rhino advanced along the table edge to his right, while the Predator moved 12" to hide behind the center ruin. My movement was a little more aggressive, with all of the rhinos moving in a line toward his rhino, to my left, with the CSMs in front, the Thousand Sons in the middle, and the Khorne Berzerkers in the back. The Vindicator moved 6" to get a clear line of sight to the Predator. The shooting phase was slightly unsuccessful, with the Vindicator firing at the Predator, but missing widely.

Turn 2

In turn two, the Terminator Lord failed to show up. Carter's rhino moved up, and disgorged the CSMs inside behind the ruin to the left of my deployment zone. The Predator stayed right where it was, content to hide like the coward it was. In the shooting phase, the CSMs ran 6" behind the
ruin. In my turn, the Vindicator adjusted position slightly, and my CSMs disembarked from their rhino, their sights set firmly on the enemy Rhino. The other rhinos moved up. in the Shooting phase, the Vindicator took another shot at the Predator, which also scattered wildly. The CSM with the meltagun fired at Carter's rhino, immobilizing it.

Turn 3

Carter's Terminator lord showed up, teleporting in between the Khorne Berzerker's rhino and my Vindicator. His predator finally moved up, It's gun crew getting a lock on the CSM's rhino. The shots hit, one penetrated the Rhino's armor, and what did he roll for damage? A 1, which was ignored by the Daemonic possession. His Terminator lord ran 2" closer to my Vindicator. in my turn, the CSM's rhino ran away. The CSMs in question moved up to face down the Predator, and the Sorcerer and the Khorne Berzerkers disembarked from their rhino, heading towards the Terminator Lord. The Vindicator moved so that, tracing Line of Sight through several windows, it had a shot at the Plague Marines, who were still hiding behind the ruin. in the shooting phase, the Khorne Berzerkers and Sorcerer fired their pistols at the Terminator Lord, failing to harm the almighty champion of the Plague God. The Vindicator fired on the Plague Marines, getting a direct hit. The Plague marines threw themselves desperately to the ground. Even so, 2 of them were killed by the massive blast. The CSM with the meltagun missed the Predator horribly. In the Assault phase, the CSMs assaulted the Predator, and their determined grenade throwing resulted in the stunning of the crew. The Berzerkers assaulted the Terminator lord along with the Khorne Berzerkers. The Sorcerer was first to strike, failing to do anything at all, as did the rest of the Berzerkers. The Terminator lord responded by hacking apart the sorcerer with his chainfist. The Berzerker with the powerfist, known as The Butcher, avenged his master by tearing the head from the lord's shoulders.

Turn 4

No movement in Carters turn. All that happened was the Predator popped smoke. in my turn, the Thousand Son's rhino reversed around the forest. The Berzerkers did the same. The CSMs assaulting the Predator backed away one inch. In the shooting phase, the Vindicator fired again at the Plague marines. Another direct hit! 6 of the Plague Marines were blown apart by the massive shell. The CSM with the meltagun once again missed the Predator at point-blank range, and the Khorne Berzerkers ran 4". In the Assault Phase, the CSMs swarmed over the Predator with grenades, blowing the vehicle into its component particles.

Turn 5

Carter's CSMs finally move out from behind the ruins in my deployment zone, on a collision course with the Thousand Sons. The remaining 6 Plague Marines moved out from behind their ruin, spreading out in fear of the Vindicator's demolisher cannon. in the Shooting phase, his CSMs ran 6". In my turn, the Thousand Sons disembarked, and moved up to face off with the enemy CSMs. The Berzerkers moved up behind them. In the shooting phase, the Aspiring sorcerer in the Thousand Sons squad manipulated the warp, using Gift of Chaos to turn the CSM icon bearer into a spawn! The rest of the Thousand Sons fired into the CSMs, killing 4 more. The Vindicator fired yet another shot at the Plague Marines, which scattered wildly off the table. In fact, it scattered so far that it "hit" Kasrkar's brand new Warp Spiders. The Thousand sons assaulted the CSMs, but neither side killed anyone. The game ended there, a 2-1 victory to the Warhost of Vashnaar the Tormentor!

Final Thoughts: This was a very entertaining game. I was a little afraid when I saw that great big unit of Plague Marines, but i was confident my Vindicator could take care of it. Carter is not an opponent to underestimate, having placed second in a tournament while playing Tau Empire. All in all, a very entertaining game with a good friend. Cheers!